Tutorials:Unimesh 1 - New Mesh Basics
| Tutorials by Category | |
|---|---|
|
Body Shop: Recolouring | Meshing | Modding | Sims Objects: Object Creation | Recolouring Building: Building | Landscaping | Walls & Floors | Other: Careers & Majors | Hacks and Game Mods |
Contents |
Introduction
What this tutorial will teach you
This tutorial is designed to show you the basic steps of making a Body Shop mesh using Milkshape, Unimesh, and SimPE - making a new mesh package, editing the mesh, and getting it showing up in Body Shop and the game with your changes. You will learn to make only the most basic of edits in this tutorial - it is more an absolute beginner's "proof of concept" tutorial than teaching you more advanced editing techniques. The more advanced techniques will come in the subsequent tutorials.
It's a good idea to learn using Unimesh - though there are other options (like Meshtool), nothing else will allow you to edit quite so much (including adding and deleting parts, "Frankensteining" things together, etc. - we won't be going into those more advanced techniques in this tutorial, but in later tutorials.
A little warning
Meshing is difficult! Meshing is hard! Meshing is time consuming and frustrating! This is not an easy process. Though everything will be fully explained, it's possible that you may miss something or it won't work the first time. If that happens, start over from the beginning after taking a break and try again. There is no easy 5 minute meshing technique that we're not telling you - this really is the easiest, best way to do it.
Prerequisites
You MUST have existing knowledge of creating clothing using Body Shop. This is not for absolute beginners - experience in creating clothing recolours/retextures will serve you well going forward. If you do not have that preexisting knowledge, do not continue with this tutorial. Instead...
![]() See: Body Shop Recolouring Tutorials
See: Body Shop Recolouring Tutorials
What you will need:
You must download and install all of the following programs and utilities before beginning this tutorial. If you are having any trouble or questions on installing them, please look for info on their individual sites/pages.
- Milkshape - Current version as of this writing is 1.8.3. We will be doing our mesh editing in Milkshape. This is not a free program! It will allow you to use it free for 1 month, but after that you will need to pay $25 to register it. It is worth the money. There is no version of this tutorial using free programs - nothing else uses Unimesh and allows you to make major edits for such a low price.
- Unimesh Plugin for Milkshape - Current version as of this writing is 4.09. This plugin allows proper import/export of Sims 2 meshes into Milkshape. Unimesh is free. Read the included "UniMeshReadMe.txt" file for installation instructions.
- SimPE - Current version as of this writing is 0.68. Get whatever the latest version is. SimPE allows creation of a new mesh package linking the mesh to a recolour file.
- Needed Software to Run SimPE - This is listed as a heading on the SimPE download page with links there. You will need both the Microsoft .NET Framework Version 2.0 (this is different from .NET 1.0!) and Managed DirectX 9c (this is different from regular DirectX!) - make sure to download and install both or you will get errors on the SimPE parts.
- 1-2 Hours to complete this tutorial, assuming you do it right the first time. It may be quicker or slower depending on how fast you read and work.
The Tutorial:
You may click on any image below for a larger version. Images are shown thumbnailed here for faster page loading, but all images will display full-size if clicked.
Part 1 - Create a Recolour
All Body Shop meshes are linked to a recolour file. Without both the mesh and recolour file, you will see nothing showing up in game or in Body Shop for your recolour. Therefore, you always need to start by creating a temporary recolour file.
You must use a Maxis mesh for this to work! Editing custom meshes is not covered in this tutorial, and will not work the same as described here. For the sake of learning how to do this properly, please edit the same base game dress that is shown in the tutorial. Always do the suggested project when doing a tutorial the first time - it will make it much easier to follow along.
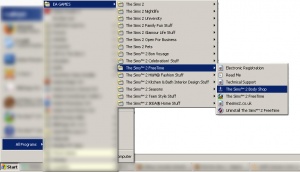
1. Run Body Shop. Remember to always use the shortcut for the most recently released expansion. Start - All Programs - EA Games - The Sims 2 (or latest expansion) - The Sims 2 Body Shop.
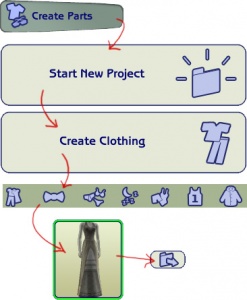
2. Click on Create Parts - Create Clothing - Formal. Scroll toward the end of the catalog until you find the dress pictured. It comes in several colour options, but I'm choosing the cream with lace version, mainly because it's the prettiest. Click on the button at the bottom to Export Selected Textures.
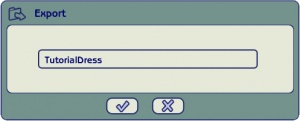
3. Give your project a name. "TutorialDress" is a good name for this project. Then click the checkmark to Accept Project Name and go ahead and make the new project.
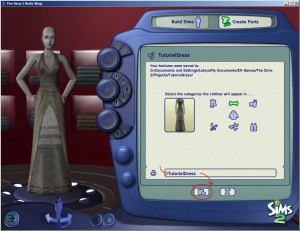
4. Give your project a tooltip. "TutorialDress" is a good tooltip. Leave the category as Formal. Then click the button at the bottom to Import to Game to finish the project.
5. Close Body Shop.


