Overview
This is not a tutorial, but a tiptorial, showing the basic steps of creating a hair mesh from scratch. This is not a full tutorial - I'm not explaining every little thing, just showing how I make a hair mesh from beginning to end in the most basic overview. Individual meshers may do it differently, but this is how I do my hairs.
Part 1 - Planning
I want to make a nice long, somewhat messy adult female hair for a particular character from a book. I've looked for something out there that fits my needs, but nothing is quite what I want (I'm too picky). I know I want it at least mid-back, not too much in the face, sort of shaggy and a bit layery, no bangs, midpart or no part.
So first, I plan. I've got a really clear picture of the hairstyle in my head, but getting that into a Sims 2 hair mesh is going to be tricky. I also need to think about the way it's going to be layered before I start too - nothing worse than getting halfway through something and realizing it just ain't gonna work.
I always start by using Dr Pixel's example bodies and faces, so I import whatever age/gender I'm gonna start with. I don't need the bottom of the body or the arms, so I've chopped that off, giving myself a basic bust as my template.
I then take a screenshot of that, put it in Photoshop, and do a basic sketch of the hair shape that I want from the front and side on top of my screenshot. This gives me a good idea of the overall look as well as where I might want to make different layers.
Then on my side view, I plan out basically what layers I want to have. Because I'm doing some sort of shaggy, messy layers with this one, I want kind of a "tiered" effect with layers at different heights. I'll also have some little wispy pieces on top to make the hair seem a bit messier and unkempt, so I'll have a very top layer for that, with most of it cut out. I could do this for my front view too, but considering the hair is mostly tucked behind the shoulders and I'm not doing a very complicated front, I'm not going to bother for this hair.
Part 2 - Meshing
Then, it's time to actually make the mesh parts. This is the part I find the most enjoyable, but it's important not to rush the planning so I don't screw up on this part and get annoyed.
There's still little bits of planning for each part to be done here though. Before I can add the first new part, I need to see how many vertical and horizontal divisions I need for the new piece. I'm going to start by looking at where I want to join the top of the hair to the scalp and see how many horizontal divisions there are there. I'm picking this seam behind the ear... counting from ear to ear, it has 6 horizontal divisons (I've marked 4 of them in my pic - the others are around the other side of the head), so I'll make my new piece have 6 horizontal divisions. This should give me enough flexibility along the back, too.
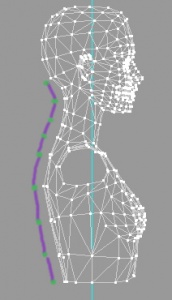
Then I need to see vertical divisions. I generally try to match my vertical divisions to the ones already in the body, so it's easier to animate. It doesn't have to be exact (so I'm not matching them perfectly in the neck) but this at least shows me where to add detail - where it's necessary, but no more than necessary. So this gives me 8 vertical, and 6 horizontal.
So I can go ahead and make my first new part with, again, 8 vertical and 6 horizontal divisions. Exact positioning doesn't matter too much here - I just need it basically the right size to fit where I want it. Note I'm going a little lower than I was previously - I decided I wanted it a little longer than my plan.
And then it's just a matter of fitting it into place the way I want it. I use a combination of select, move, and scale to do this, and end up turning the 3D view around a lot to check how it looks from all angles. There's really no trick to it - just moving things where they need to go, often vertex by vertex. I do try to keep the vertices lined up in the back as much as possible though, so it'll be easier to animate. When I'm done moving it into place, I Align Normals on the whole thing so I can see how it looks nice and smooth. I've turned on coloured groups here for your benefit so you can easily tell which is the new piece I added - the red one.
When I look at this new section from the front, I like the shape of it, but it doesn't really curl around enough to cover the side/back (the area under and behind the ear) entirely. So, deviating slightly from my plan (which is fine - it's there to guide me, but I can take small detours), I'm going to add a little 1 horizontal, 5 vertical "patch" on each side which will lay over the shoulder and cover that part. You can see the unpatched and patched version in the pic.
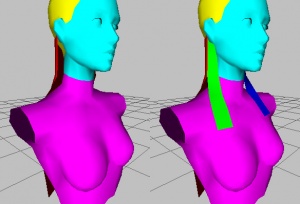
Then it's just a matter of continuing to add parts. Here's my second piece, a bit higher up (the yellow piece highlighted red - colored groups makes it easier to see, but the scalp is yellow too). It doesn't match up exactly with a seam in the scalp all the way, but that's fine.


